Diff and LaTeX diff: how to compare two files
History:
- 2022-09-05: 初稿
编辑文档时,我们经常需要比较两个文件(或一份文档在不同时间的两个版本)的不同之处,并以某种可视化形式将其输出。这一操作在版本控制系统(Version Control System, VCS)及论文出版中十分常用。
Comparing two generic text files 比较一般文本文件
首先讨论一般纯文本文件(plaintext)的比较。 macOS 和多数 Linux 发行版都自带了一个 diff (link) 命令,这是一个按行比较文件差异的工具。
GNU diff - compare files line by line
我们首先创建如下两个示例文件:
1.txt:
This is my initial version.
Some text here ...
2.txt:
This is my revised version.
Some revised text here ...
然后运行 diff 1.txt 2.txt,输出如下:
1,2c1,2
< This is my initial version.
< Some text here ...
---
> This is my revised version.
> Some revised text here ...
其中第一行 1,2c1,2 左边的 1,2 表示文件 1.txt 的第 1,2 行,c 表示 change (类似地,a - append, d - deletion),右边的 1,2 表示 change 后的结果在文件 2.txt 中对应的位置是 1,2 行。Stackoverflow 上有一个对 diff 输出格式详细的解答。
事实上,git 带有一个更好看的 diff 工具,例如我们可以使用下述命令(不需要建立 Git Repository):
git diff --no-index --word-diff=color 1.txt 2.txt

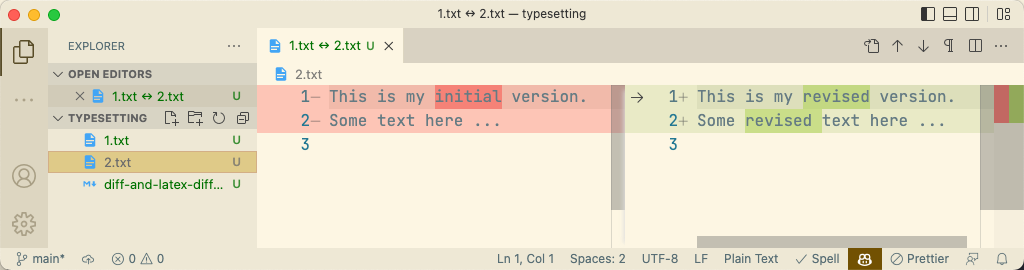
另外,一些图形化的 VCS 客户端/编辑器支持双栏可视化 diff,例如在 Visual Studio Code 中,在左侧 EXPLORER 中依次:
- 右键单击一个文件,选择 Select for Compare;
- 右键另一个文件,选择 Compare with Selected.
可以更直观地比较两个纯文本文件的差异。
Tracking changes between two .tex files and generating the highlighted .pdf 生成高亮修改部分的 PDF
对于使用 VCS 管理代码的程序员来说,上述 diff 工具几乎已经够用了。但是,对于使用 LaTeX 生成论文的作者而言,这些工具还是太弱了:
- 首先,
diff的输出对于 text heavy 的论文而言很不直观。而且按行 diff 很不灵活,必然导致审稿人眼花缭乱。 - 而
git diff和 VS Code 等带颜色的直观diff工具,只适用于作者在自己电脑上查看,其格式很难输出(not portable)。你很难复制带颜色的终端文本传送给审稿人——总不能截一堆图片吧? - LaTeX 文档的源码
.tex文件本身是纯文本,无法承载颜色信息。也就是说,「直接用 LaTeX 编译diff的结果」也是意义不大的。 - 由于 LaTeX 文档的源码混杂了很多控制命令,有时候直接
diffLaTeX 文档源码,可能会产生有歧义甚至无法编译的代码,例如考虑以下文件:
1.tex
\documentclass{article}

\begin{document}
  \section{Introduction}
    This post shows how to use latexdiff to compare two versions of your manuscript.
    \subsection{Related Works}
    Some related works go here.
\end{document}
2.tex
\documentclass{article}

\begin{document}
  \section{Introduction}
    This post shows how to use latexdiff to compare two versions of your manuscript.
  \section{Related Works}
    Some related works go here.
\end{document}
如果直接执行 git diff --no-index --word-diff=color 1.tex 2.tex,生成的结果是:
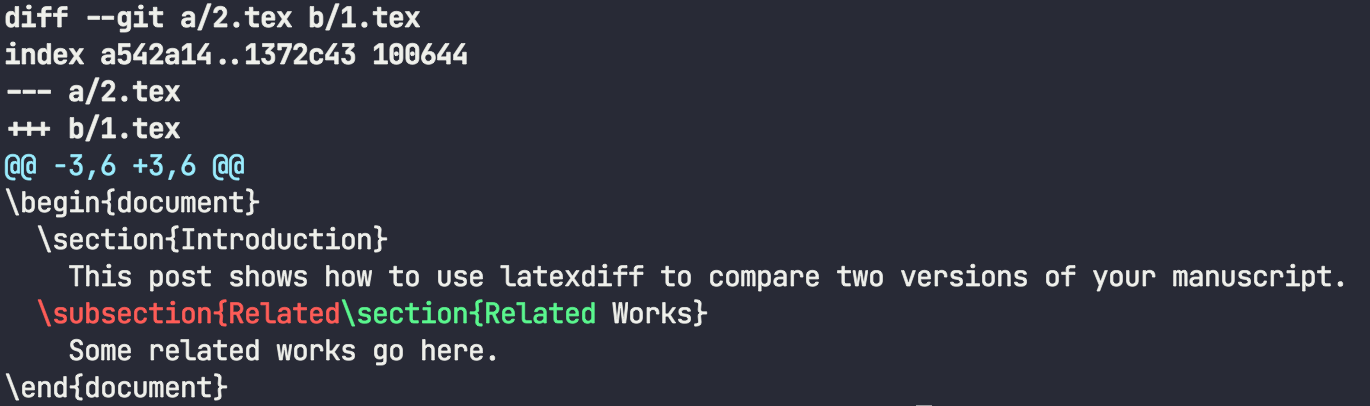
这是无法编译的 LaTeX 代码。于是,我们需要一个工具,它能够比较两个 .tex 文件,并生成可编译的 LaTeX 代码,且编译后的 PDF 能够像 Microsoft Word 的修订模式(Review - Track Changes)那样以红蓝色、删除线等直观地高亮修改过的地方。此工具即是 latexdiff.
Basics
假设你投稿了一篇以 LaTeX 写成的 Manuscript,其文件名为 initial.pdf,经过第一轮评审,论文需要 Major Revision,你需要在 X 天后提交修改后的文件 revised.pdf 及一个长得像 Microsoft Word Revision Track Changes 模式的 diff.pdf 以标示哪些地方修改了。
此时,使用 latexdiff 的最基本工作流如下:
- 复制
intitial.tex->revised.tex - 根据审稿意见,修改
revised.tex - 运行
latexdiff initial.tex revised.tex > diff.tex - 编译
revised.tex及diff.tex文件,生成 PDF,即为 Revision 后需要提交的文档。
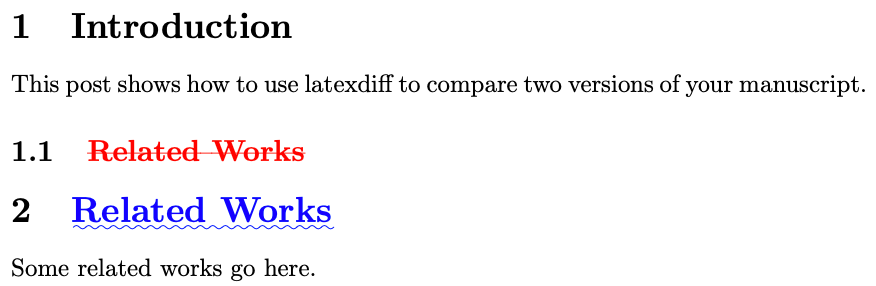
上文例子的输出效果:
The --flatten flag
上述最基本工作流有一个问题,即如果你的文档 .tex 源码是多文件结构,例如使用了 \input 命令,将正文文本放置在单独的文件中:
initial.tex
\documentclass{article}

\begin{document}
  \section{Introduction}
    \input{intro}
\end{document}
revised.tex
\documentclass{article}

\begin{document}
  \section{Introduction}
    \input{intro-revised}
\end{document}
如果直接运行
latexdiff initial.tex revised.tex > diff.tex
结果是 latexdiff 仅仅会将 \input{intro} 语句换成 \input{intro-revised} 语句,即输出的 diff.tex 中仅有 intro-revised.tex 的内容,无法体现 intro.tex 和 intro-revised.tex 两者具体内容的差异。
此问题的一个解决方案是使用 --flatten flag,此 flag 告诉 latexdiff,在执行比较之前,先将 .tex 中的 \input 及 \include 命令展开(即插入实际引用的文件内容),再进行 diff 比较。
The --append-context2cmd flag
在很多 LaTeX 文档中,一些命令,如摘要(\abstract{})可能并不处于 \begin{document}\end{document} 之间,latexdiff 通常以与正文不同的方式处理,很有可能无法正确地生成 \abstract 的 diff。此时可以使用
latexdiff --append-context2cmd="abstract" 1.tex 2.tex > diff.tex
使 latexdiff 正确地处理摘要。除摘要外,一些其他命令可能也需要类似处理。--append-context2cmd 是一类 flags 其中的一个,这里有一份更完整的列表。
The \sloppy command
在排版要求“两端对齐”(justified text)的文档时,我们经常会遇到文字宽度与行宽度不匹配的情况。为了保持两端对齐,排版系统通常会使用下列方法:
- 拉宽行内各单词的间距
- 使用连字符拆分行尾过长的单词 (hyphenate)
通常排版系统 Hyphenate 的行为可以由用户配置。
 Source: https://practicaltypography.com/justified-text.html
LaTeX 的 Hyphenation 机制
目前,LaTeX 默认配置下支持 Hyphenate。显然,软件对 Hyphenate 的支持(例如,什么时候该加 hyphen 什么时候不该加,加在单词的什么地方等等)因语言和词汇而异。LaTeX 默认开箱配置下仅支持英语:
LaTeX hyphenates words whenever necessary. Hyphenation rules will vary for different languages. LaTeX only supports English by default, so if you want to have correct hyphenation rules for your desired language, see Internationalization.
有一些 package 如 hyphenat、extdash 提供了一些额外的控制 Hyphenate 行为的命令,而 babel 则为 Hyphenation 提供了多语言支持。
latexdiff 带来的 Hyphenation 问题
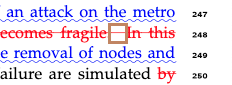
latexdiff 会将新增和删除的文字包含在 DIFaddbegin \DIFadd{ }\DIFaddend 和 DIFdelbegin \DIFdel{ }\DIFdelend 之间,这种行为可能导致 LaTeX 无法对大括号 { } 中的文字正确地进行 Hyphenation,例如下图中第 248 行最后一个单词,超出了页面边缘:
那么为什么 LaTeX 不将此单词换到下一行,并使用拉伸单词间距(allow white space to stretch)的方式保持本行的两端对齐呢?原因是 LaTeX 有惩罚机制,即单词间空白 stretch 越多,罚分越高。默认配置罚分不能超过一定阈值(\tolerance),否则要么 Hyphenation 要么产生 overfull box。上例即产生了 overfull box。
一个 Workaround 是 \sloppy 命令。该命令将 \tolerance 设置为一个很大的值(9999),即允许更大的行内空白,以保持两端对齐,如下: